
Search Local Images from a WorkBuddy Conversation
From version 3.14, Assist connects to WorkBuddy. Describe a picture or attach a reference image in the conversation to search your local library, narrow the scope, filter results, and see the pictures in the chat.
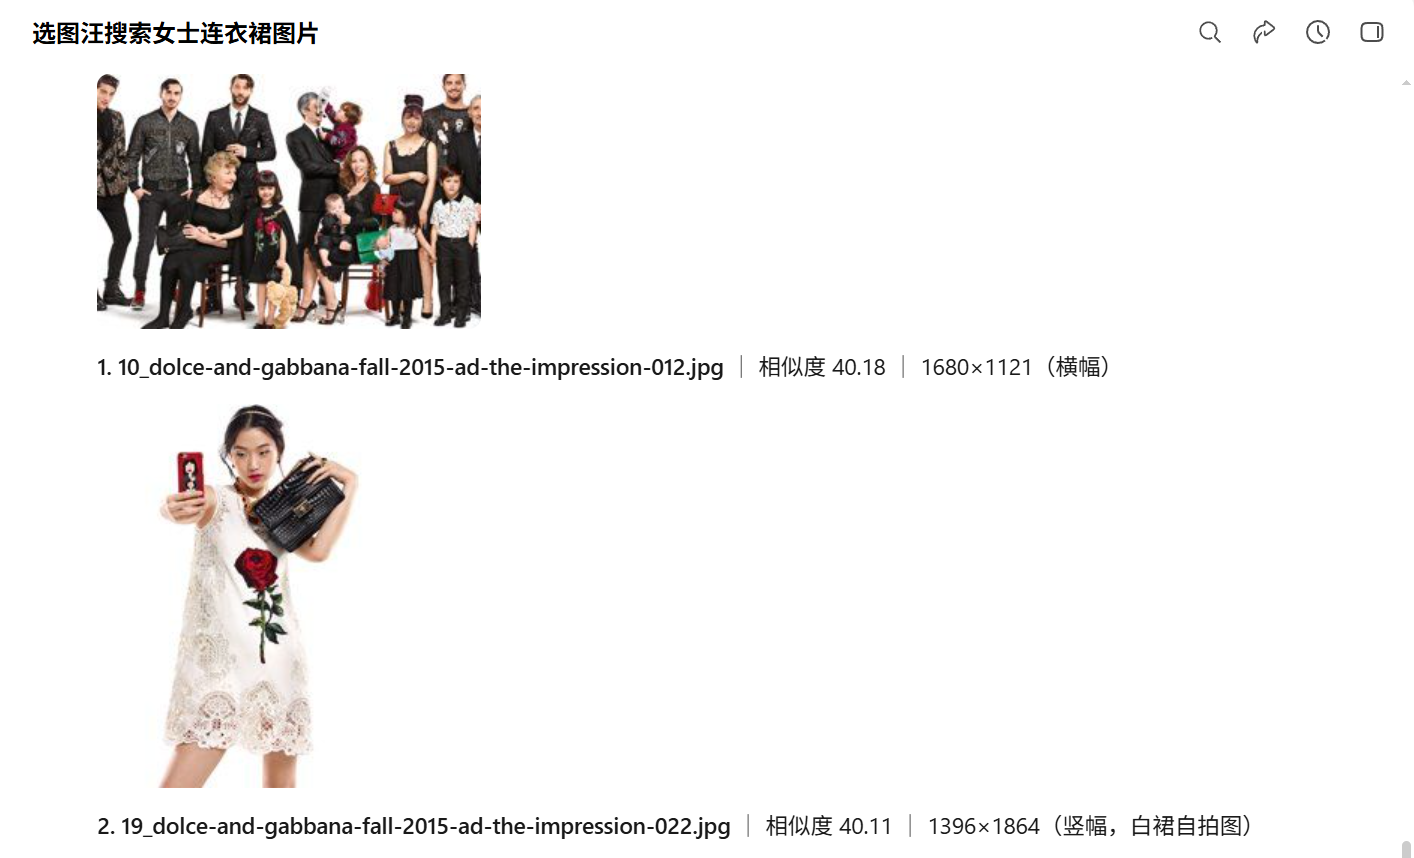
From version 3.14, Assist connects to WorkBuddy. Describe a picture or attach a reference image in the conversation to search your local library, narrow the scope, filter results, and see the pictures in the chat.
The AI assistant connection is available from version 3.14 and currently supports the Windows client. Earlier versions do not have this entry in Settings. Update the normal way when 3.14 is released; there is no need to reinstall for it.
Once connected, you can say "find people wearing dresses in my product folder" in a WorkBuddy conversation. The assistant asks Assist to search the image library on your computer and shows the pictures in the chat. The search still runs in Assist on your computer. WorkBuddy does not build a second library. The screenshots in this article were taken with the Chinese interface.
What it can do
- Search by description: describe the picture you want in one sentence. This is the same semantic search the client offers.
- Search by a reference image: give the assistant a local picture and choose Global, Global · Subject, Global · Color, or Local · Keypoints. The reference image does not need to be in the library.
- Narrow the scope: search only one folder, including its subfolders, or one collection.
- Filter results: by similarity, width and height, orientation, star rating, color label, or file format, within the candidates returned by this search.
- See pictures in the chat: by default the assistant shows the most relevant pictures with file name, similarity and size.
- Open them in the client: say "open these results in Assist" and the client shows the same set.
- Read text in a picture: point to one local picture and ask for its text. That picture does not need to be in the library.
- Index a folder: if a folder has not been indexed yet, tell the assistant its path. Assist indexes it and shows the progress in the client task bar.
The assistant never deletes, moves, or renames your original files, and it does not reorganize folders.
Before you connect
- Assist 3.14 or later, with the image library you want to use already selected.
- WorkBuddy 5.0 or later. Menu names below follow 5.5.6.
- The folder you want to search has been indexed for the search method you need. If not, connect first and let the assistant index it, as described below.
Step 1: allow the connection in Assist
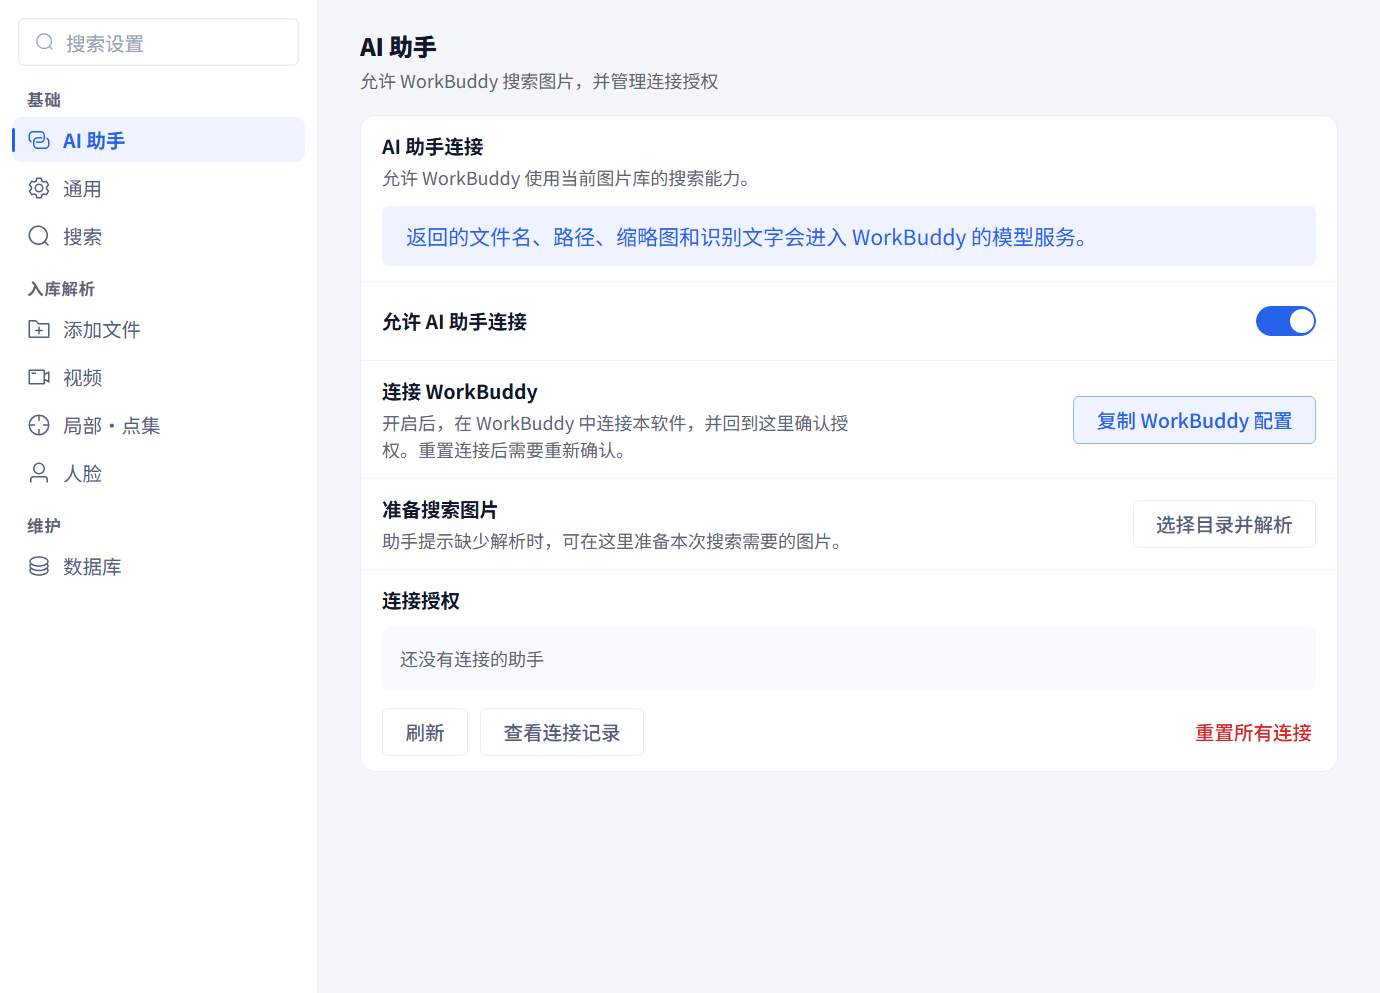
Open Settings, choose AI assistant on the left, and turn on Allow AI assistant connections. It is off by default, and WorkBuddy cannot reach Assist while it is off.
Then click Copy WorkBuddy configuration. The connection configuration is now on your clipboard.
Step 2: add the connector in WorkBuddy
In WorkBuddy, open the experts, skills and connectors area, go to custom connectors under Connectors, choose to configure MCP, paste the configuration you copied, save it, and enable the connector.
The first time WorkBuddy uses a new connector it asks whether you trust it. Choose to trust it. This is WorkBuddy's own confirmation and is separate from the confirmation in Assist in the next step. Both sides need your approval.
Step 3: confirm access in Assist
Start any image search from WorkBuddy. Assist shows an AI assistant connection prompt asking whether WorkBuddy may search and index the specified images. Click Allow connection.
After that, Connection access on the AI assistant page lists WorkBuddy as allowed. You do not need to confirm again after restarting the software.
If you clicked Not now and want to connect later, click Reset all connections under Connection access, then start a search from WorkBuddy again. The prompt appears again.
Start searching: things you can say
- "Find people wearing dresses in my product folder and show the pictures here."
- "Find images similar to this photo using the subject strategy." Attach the reference picture to the conversation when you say this.
- "Keep portrait images at least 1200 pixels wide, then open these results in Assist."
- "Read the text in this picture."
Each search returns 20 candidates by default and up to 100 on request. Filtering works on that set of candidates. It does not search the whole library again, so ask for more candidates first if you want a wider filter. Similarity is used for ranking. It does not guarantee a correct match and must not be used to decide whether two pictures show the same person.
Open the same results in the client
The conversation above searched for people wearing dresses, and the assistant first showed 3 pictures. It was then asked to keep portrait images only and open them in Assist. The client added a semantic search record under Results on the left and shows the single filtered picture on the right. Its file name and 40.11% similarity match the second picture in the conversation.
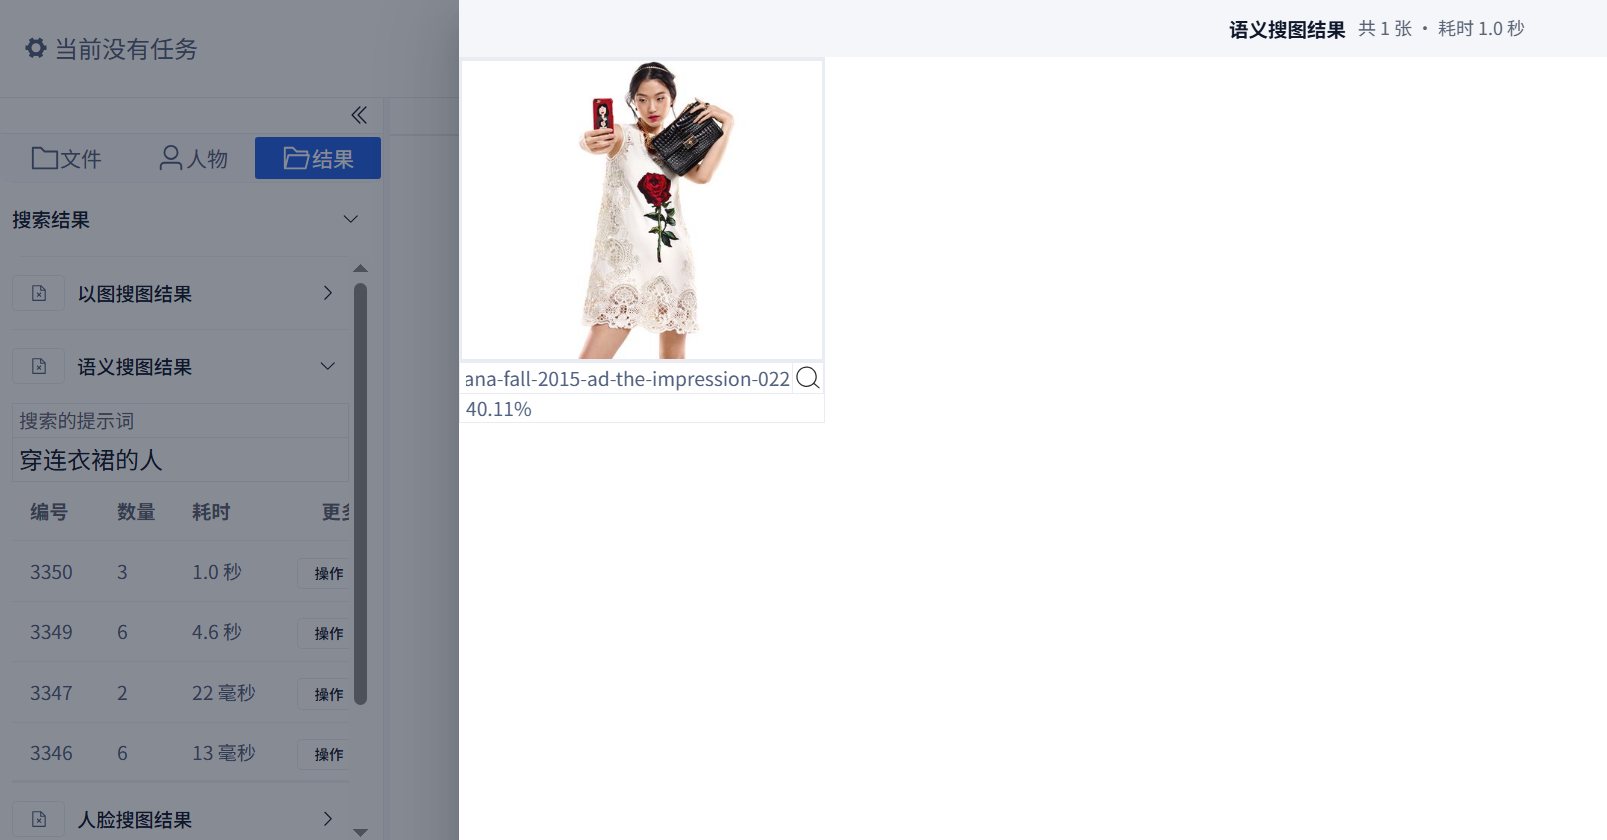
In the client you can keep working as usual: view the full image, add it to a collection, export, or locate the file.
When a folder has not been indexed
A library that already has data does not mean the folder you named has been indexed. When the assistant finds that a folder lacks the index it needs, it asks Assist to index that folder directly. You only need to give it the folder path. By default it indexes that level only, so say so if subfolders should be included. Indexing only reads your files and writes to the library index. It does not change the originals. Progress is shown in the client task bar, and when it finishes the assistant continues with the original request, so you do not need to describe it again.
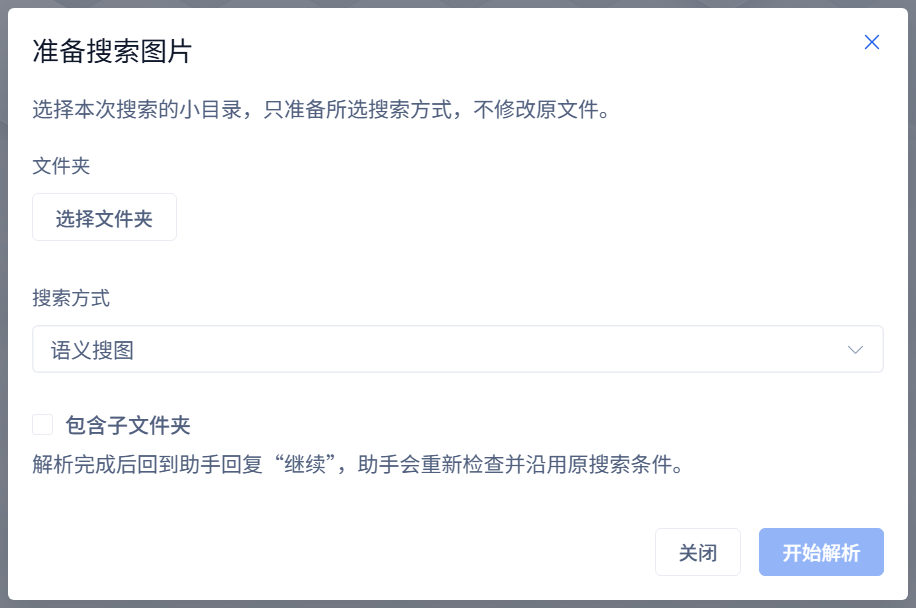
You can also do it yourself: on the AI assistant page click Choose a folder and index, pick a folder and one search method, and click Start indexing. When it finishes, go back to the conversation and reply "continue".
Where your data goes
The search runs on your computer. The results the assistant receives, including file names, file paths, thumbnails and recognized text, enter WorkBuddy's model service. That is how the assistant can understand and show them. Chinese descriptions may also use the client's translation service. For a library where this matters, leave Allow AI assistant connections off.
The chat shows thumbnails, not originals. Thumbnails are cached on your computer, up to 256 of them, and entries older than 7 days are cleaned up when new thumbnails are created. They are not uploaded to a public image host. If pictures in an old conversation no longer display, ask the assistant to fetch the thumbnails again.
View connection log on the AI assistant page shows when the assistant connected, which functions it called, and how long they took. The log stays on your computer and does not record search text or image content.
Usage time and sign-in
Connecting an AI assistant does not extend your usage time. Every function keeps the client's existing authorization.
- When usage time runs out, the assistant tells you that you need to buy time, and Assist opens the Account page. After the purchase, return to the conversation and ask the assistant to continue.
- When the sign-in has expired, the assistant asks you to scan the code again, and Assist opens the Account page as well. Signing in again does not require buying time you already have.
In both cases the connection itself is still there. You do not need to reinstall or pair again.
FAQ
- There is no AI assistant page in Settings: the version is older than 3.14, or you use a custom edition where this function is not enabled. Ask your supplier about a custom edition. Custom and offline-license editions update through their own channels, so do not install the public installer over them.
- Disconnect for a while: click Revoke access under Connection access, or turn off Allow AI assistant connections. WorkBuddy can no longer call Assist as soon as it is off.
- The assistant cannot find a new function: after updating Assist, turn the connector off and on again under custom connectors in WorkBuddy so that it reloads the function list.
- The assistant says it is busy: too many searches were started at the same time. Wait for the running search to finish and try again. You do not need to reconnect.
- Nothing was found: it only means there was no match in the chosen scope this time. Try another description, widen the scope, or check that the folder has been indexed for that search method.